CLICK HERE FOR FREE BLOGGER TEMPLATES, LINK BUTTONS AND MORE! »

Sunday, September 12, 2010

My Little Gator

So my creative side is still flowing :) I have another scrapbook 1pg. layout. As most know it is football season. I am and will always be a Florida Gator. So with that said, my dog will always be my little gator! The jersey in the picture was passed down to Solomon from my first boxer Jakin. It was his jersey and when he passed on to the Rainbow Bridge it became Solo's. 

This is a 12x12 layout. The brown circle is the inside piece to the Solomon & his Duck layout. I then cut 1' circles to create the scalloped edge. The scalloped edge along side the picture is from Just Because Cards and it's cut at 1.56x6" on "real dial size". The bracket is cut at 1.63x5" on "real dial size". The bracket is from the Home Decor cartridge. The cute little gator and all his parts are cut at 3.23x1.23" and he is from the Create a Critter cartridge. I don't have a cartridge that cuts a football so I made my own by using an oval from the George and Basic Shapes cartridge cut at 1.85x2.50". I then cut two small strips of white paper and adhered them to the brown oval. I used my Elmer's Painters paint marker in white to draw on the stitching lines. If you have any questions just leave me a comment and I'll try and get back to you as soon as I can. 
So last weekend I found myself at Michaels. I also go straight for the dollar spot as most people tend to do. Ran across these cute containers that looked like buttons and contained buttons within them. I picked up the red, green, and white ones figuring I could make small cute either gift tags or cards for gifts this holiday season. See I need to start on my Christmas cards early this year because I have over 50 to send out! I know that's a crazy amount but I always participate in a Boxer (dog) Christmas card swap :) and the list keeps growing. Also, so enough rambling and on to the cards. 

The cards measure 4 1/4 x 2 3/4" or just cut a 4 1/4 x 5 1/2 in half and bingo! I then placed the buttons on the card and it just all came together. It wouldn't be complete without a little stitching along the edges.  Let me know what you think.

Sunday, September 5, 2010

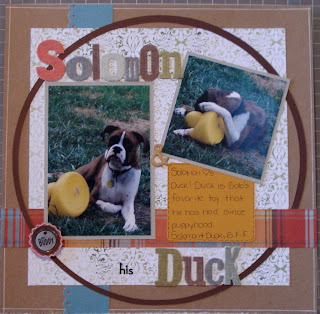
Solomon & Duck

Alright, so my crafting mojo has really been flowing this weekend :) Here is another layout I did for Solomon's scrapbook. I hope you enjoy. Inspiration from the Two Peas in a Bucket website gallery.


Thanks for stopping by :)

Recycled Crafty Ideas

Hello my blogging friends :) It's been a while again since my last post. I am sorry for that. I have been finishing the Harry Potter series (again) and I just couldn't put it down...not even to blog and/or craft. If you haven't read the series you should. It just isn't a children's book. I love them all and hopefully one day soon I'll be able to visit the Wizarding World of Harry Potter in Orlando FL. I am such a junkie of HP that I own a set of robes (Gryfindor of course), two wands, and an entire Gryfindor outfit. I know what you are thinking...this girl needs some help. HA! I love it! 

So on to what this blog is actually about. A few weeks ago I attended a Thirty-One party at a friends house. I noticed these cute little pens she had and decided that I could recreate these, and so I did. They were super easy to make. 
So here's how you can recreate it. I bought a bunch of flowers (there were all grouped together). I clipped about 2-3" of stem and removed any leaves. I bought a 10 pack of BIC pens and removed the lids (you wont need these). I then paced the flower and stem close to the pen and started to wrap the floral tape around the flower stem and pen until i reached the end of the pen. I filled a candle jar and a cleaned jelly jar full of small rocks and placed the flower pens in the rocks. Perfect :) I now have a cute useful fall arrangement.  

Next on the list of crafty ideas is recycled tomato container. I saw Kerry do this on YouTube. Her channel name is "pantala40'. I highly recommend watching her :) So anyway on to the project. 

So here's how to do it. I took one cleaned out cherry tomato container and measured the lid part that is kinda sunken in (this part will vary depending on the size of the container you use). I cut two of the shapes for the top and then the other is for the inside so you wouldn't see the label and the adhesive. Next I stamped the cute Christmas tree in gold ink and layered it on some green and then red card stock from Basic Gray. I popped that up on pop dots. I filled the inside with raffia and placed four cranberry colored votive candles inside. I closed the lid and trimmed any pieces of raffia that were sticking out. I tied the cute harvest colored ribbon around the entire container and it was finished. A quick and inexpensive gift to give family, friends or even coworkers for the holidays. 

Stay tuned for the next crafty project from the Mad Scrapper :)